


The Top 3 Technical Problems I Saw as an Act-On TSE and How to Solve Them
Before starting at Tactical, I worked as a Technical Solutions Engineer at Act-On. When I worked there, the TSEs were the first line of support for Act-On’s customers and handled the majority of technical support issues. If you have called the support line and spoken to someone or submitted a request online and worked with someone via email, you were working with a TSE. The volume of issues and requests we were exposed to was, naturally, much higher than most people would see. This meant that we had a lot of experience working in Act-On, learning its ins and outs and oddities, and helping our customers to solve problems. I’m going to dig into some of the most common technical requests I saw in my time as a TSE, and how they can be resolved.
Message Validation Failed
You’ve built out the perfect email, you have the recipients set up, you click on Send Now and…

When a message is sent by Act-On, the system checks for a number of things to ensure the message is okay to send. The list of these things can be found in the Review tab of the message composer, along with the current status of each:
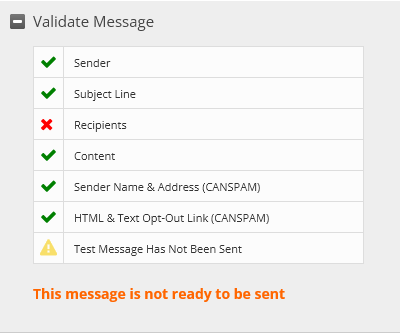
The errors that show here aren’t necessarily very intuitive, so I’ll give a quick breakdown. The symbols indicate the status of each part of the validation.
• A green check mark indicates that a condition is fulfilled.
• A yellow triangle serves as a warning that something needs attention, but will not prevent the message from being sent.
• A red X indicates that something is wrong and will prevent the message from sending.
The most common error encountered here is “HTML & Text Opt-Out Link (CANSPAM)”. What this means is that Act-On cannot find the URL of the current Opt-Out link for the account anywhere in the message. The Opt-Out Link is automatically updated to the most current one when using the Default Footer, but if you have set up a custom email footer or are building a message from custom HTML code, you may need to update it, especially if the custom marketing domain for the account has changed. To insert the correct Opt-Out link, you can edit your current footer and use the personalization tool to add the current version from the Header/Footer Link tab.

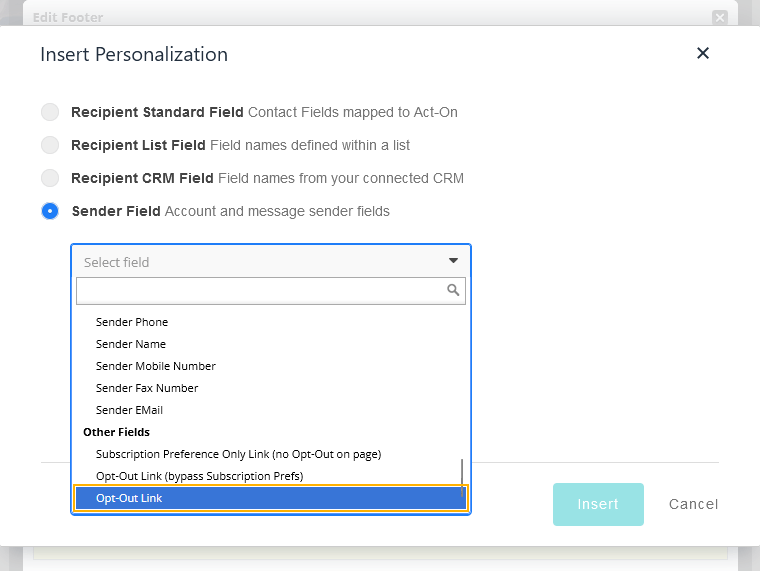
Once the Opt-Out link is inserted and styled appropriately, you will want to update the text version of your footer to reflect the changes as well, using the “Generate from HTML Version” button. As a final note, the warning for “Sender Name & Address (CANSPAM)” will not prevent your message from sending. This just means that Act-On is not seeing the personalization fields it uses to bring this information in, which are {{Account.COMPANY}} and {{Account.BIZ_ADDRESS}}. As CANSPAM law requires that messages include the name of your business and a physical address, you will need to make sure it is included in your message, either through Act-On’s personalization or by typing it out manually.
Message Did Not Send to All Recipients
So you’ve sent your message and you’re following up on the response when you notice that it wasn’t actually sent to everyone on the list you chose. The list had 2,000 contacts in it, but Act-On only sent to 1,500. Or, worse yet, it shows that it sent to 0! There are a number of reasons that a message might fail to send to specific contacts, even if the message itself was able to launch. Fortunately, Act-On provides the list of records it failed to send to and the reason it failed. With this information, we can piece together what happened so that we can fix it and possibly re-send our message to those contacts. To start with, we want to navigate to the message report. For a message sent normally, this will be under Outbound>Sent Messages. For messages that are responding to form submissions or part of an automated program, it will be under Outbound>Other Messages>Triggered Messages. You can open the message report by clicking on the message name, then navigating to the Report tab. Here you can see your message reporting, including the number of unique email addresses sent to as well as the number who were not sent to.
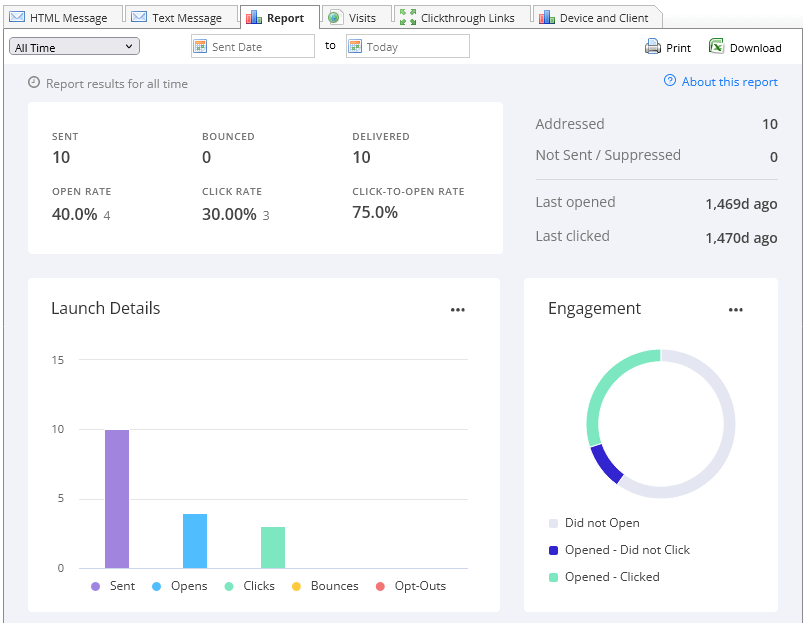
By clicking on the number next to “Not Sent/Suppressed”, we can view the full list of records who were suppressed from the send, along with the reason they were not sent to.

As an example, the report above shows that the record I failed to send to had no data in a column titled “firstname”, which I used for personalization in the message. In this case, the actual column name is “First Name”, with a space, so the system was looking for the wrong column. This message also would have failed if I had the right column name, but that contact had no data in that column. Some other common reasons for message sends to be suppressed are that the intended recipient is on the Opt-Out or Hard Bounce lists, they are missing an email address, or they have met the fatigue rules set in the account. Looking into the reasons for these suppressions can help you to explain and resolve these issues quickly and make sure your messages are being sent.
Form Submission Data Did Not Push to CRM
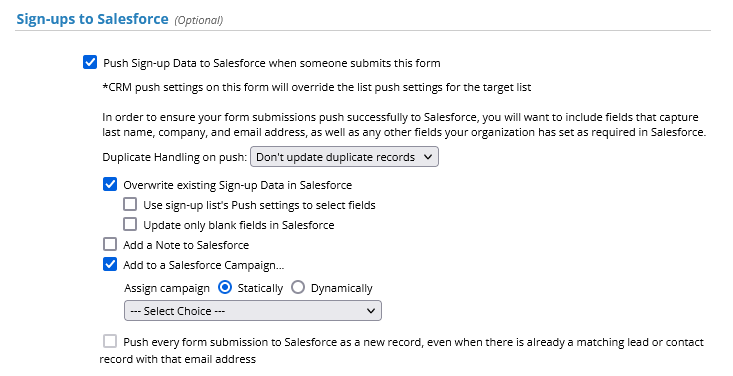
If your Act-On account is connected to a CRM such as Salesforce, you have the option to push data submitted on your Act-On Forms into your CRM. Sometimes, we will see a submission occur which should have pushed data into the CRM, but not see the data show up there. There can be a number of potential explanations for this, so we have to do some troubleshooting. The first thing we want to check is that the submission was stored by Act-On. To do this, we can navigate to the form submission list under Contacts>Other Lists>Form Submissions and make sure that the submission created a record there. If it did, we will then want to look at the form settings under Content>Forms and see how we’re set to push data. In the classic composer, it will be under the Settings tab and look like this:
In the Labs composer, the setting will be in the Properties tab and look like this:
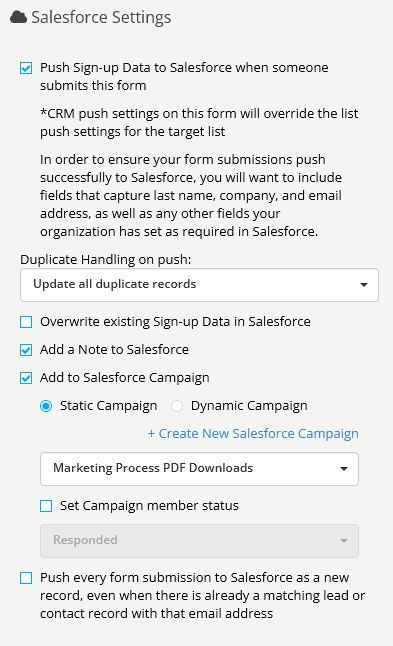
Some common settings issues for failed data pushes were:
• The form was not set to push
• The form was not set to update existing records, and the email address of the submission already existed in the CRM
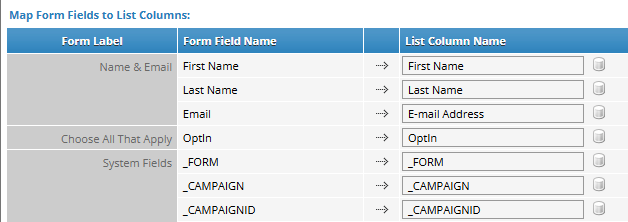
It is also possible that there was an issue pushing the data into the correct field. When Act-On pushes data to a CRM, it is usually trying to push the data into the CRM field whose label matches the column name for the data in Act-On. This can be seen in the Finish tab of the classic form composer:
Or in the Field Mappings area of the Labs composer:

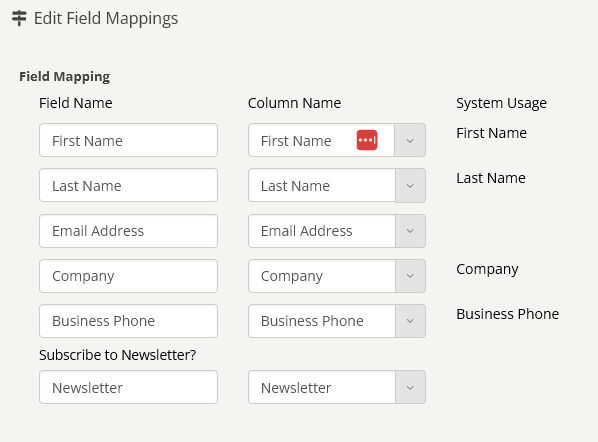
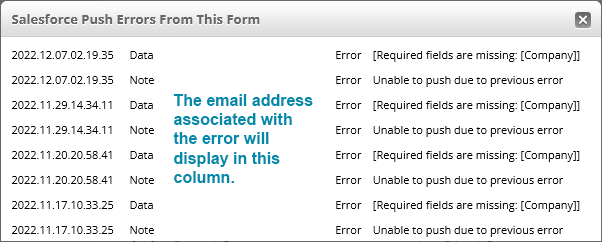
In this area, you’ll make sure the column name matches the relevant field name in your CRM exactly. It’s not uncommon for an extra hyphen or underscore to cause this data not to push. The final piece to check is whether or not the data provided by the form is enough to create a new record in your CRM. It is not uncommon for a form push to attempt to create a new record and fail because the CRM settings require a field that is not included. This would have to be checked on the CRM side of things, though. As a final note here, if you are connected to Salesforce, you can check for specific errors from your form pushes by finding your form under Content>Forms, opening the menu on the far right of the form’s name, and selecting “View Salesforce Push Errors”. This will bring up a list of all errors provided to Act-On by Salesforce for failed push attempts.
Wrapping Up
I hope this helps with some of the more common troubles people run into while working with Act-On. It is a machine with a lot of moving parts, and keeping track of all of them can be fairly intimidating at times, but if you follow up on your work and keep a level head, you can usually find what’s out of place when something goes wrong.
